#
Showing posts with label Tools. Show all posts

Monday, May 24, 2021

You can use various methods to check open ports of a server. Old school Telnet is the command prompt tool you can use easily for a 1 targeted host.


Telnet


Let's say I need to know whether https (TCP port 443) is available at facebook.com

The command would be;

telnet facebook.com 443


If it is open, it will give an output telling connecting... and then the screen will be totally black..


To quit from  the connection, you should hit Ctrl + ] keys and type quit.


Now let's try the same thing from Cisco CLI;


To quit from the session, you should hit Ctrl + Shift + 6 and release and enter X

It will go back to the Cisco CLI again but will not really disconnect the session, If you hit Enter it will continue the session again. So you need to type disconnect and hit enter..


TCPING


TCPING is a small Windows command prompt tool I use which does basically the same thing in a different way. You can download it from their official site

https://www.elifulkerson.com/projects/tcping.php

I have unzipped the folder and pasted the contents into the System32 folder.

It is simple; tcping facebook.com 443 command will show the replies if open.


Scanners


If you need to scan an entire network/subnet for open ports, you should use a network scanner. There are plenty of them and they are very easy to use. One I use in Windows is Advanced IP Scanner..


Friday, June 5, 2020

First we need to understand the algorithm of Cisco Level 7 password encryption.

Following is an encrypted output from an actual password.

044F0E151B28424929485744

There is a reference static hexa-decimal block to build the encryption. Consider this as a list.

={0x64, 0x73, 0x66, 0x64, 0x3b, 0x6b, 0x66, 0x6f, 0x41, 0x2c, 0x2e, 0x69, 0x79, 0x65, 0x77, 0x72, 0x6b, 0x6c, 0x64, 0x4a, 0x4b, 0x44}

Step 1:
The 1st two numbers (04) represent the randomly generated number in decimal which corresponds to the index of the hexa-decimal block. In this case its 0x3b. (since 0x64 is the 0th index)

Step 2:
Remaining 4F0E151B28424929485744 represent the password. Because this is a hexa-decimal string, 2 characters will be converted to binary to and it will be XORed with the binary value of 0x3b.

Let's get the 1st hex digits 4F,

4F in hex = 01001111 in binary
3B in hex = 00111011 in binary

01001111 XOR 01100110 = 01110100

Step 3: 
Convert the result to ASCII..

01110100 in bin = t in ASCII

Step 4:
Take the next index (0x6b) and do the same with the next 2 hex digits..

0E = 00001110
6B = 01101011

00001110 XOR 01101011 = 01100101

01100101 = e in ASCII

After doing it to last digit, the result will come as "testing@123" which is the password.

Python code for this logic will be like something following..


The code will be available in my GitHub repo via the following link. It has the Python code and a Brython code (html file) to embed in a web page.

Friday, September 13, 2019

Iperf is a tool used to measure traffic characteristics like bandwidth, delay, throughput etc which is widely used as a Linux application. It can also be used with windows too.

Download Iperf from their official website.


Extract the contents..


Copy the contents to System32 folder.

Open Windows Command Prompt with administrative rights.

To establish Iperf Server, enter the command iperf3 -s


It will wait for traffic from a Client..

To establish Iperf Client, open another Command Prompt and type iperf3 -c 127.0.0.1
By this command I am just generating traffic to my loopback IP because I am just using my laptop for both just for testing this app. This 127.0.0.1 should be the server IP. Traffic statics will be displayed like the following on the Client..


Traffic statics will be displayed like the following on the Server..


There are various commands which could be used to test traffic characteristics.
Just --help will list the options.

Monday, April 1, 2019

Please refer the following post which will be the preface of this post.
Deploy Cisco CSR1000v / EC2 Instance in a Public Subnet in AWS Cloud

I don't know whether this is the best way or not. It just worked for me and I love using SecureCRT instead of PuTTY. But in my case, I  had to log through PuTTY first and then create a username with a password in order to log in to CSR through SecureCRT. That part is on the above post.

Go to PuTTY and enter the following Cisco IOS command to create a new user;

username cisco privilege 15 password cisco

Open SecureCRT..

Go to Options > Global Options, select SSH2 and browse to the .PEM file you downloaded while the deployment. Click on Create Identity file, which will open Key Generation Wizard.

In the next page select RSA (the default will be DSA)


Next page, leave empty for the Passphrase..


Leave key length to 1024 in the next page,hit next and hit Finish..

Now get a new connection and try to SSH to the public IP of the Instance with the username and password created using the PuTTY session. It should work..


Saturday, April 22, 2017

If you are going to use Linux and free software you will need a SSH client like SecureCRT to access your network devices remotely. SecureCRT is a widely used industrial SSH client but it is not free. Of course you can use the Linux terminal itself but you will face limitations like session management etc. Here is the free solution, PAC Manager.  Actually it is more advanced than SecureCRT..

Be the root user..
sudo su

Enter following commands..
wget -q -O - http://archive.getdeb.net/getdeb-archive.key | sudo apt-key add -

sh -c 'echo "deb http://archive.getdeb.net/ubuntu trusty-getdeb apps" >> /etc/apt/sources.list.d/getdeb.list'

Update the packages list..
apt-get update

Install the PAC Manager..
apt-get install pac

If a dependency problem occurred,
apt-get install -f

Now open the app..


Click on New Connection & give the ip address and the username, pw.. Save and Close.


Now click on the session name and you will log in..


Tuesday, April 11, 2017

Here is a free 3rd party troubleshooting tool which can be used to monitor and take control of a Cisco IP phone remotely. As a network administrator, you will need this to test the functionality of the phones you manage. I got to know about it recently & thought to share how I use this interesting app..

Only following Cisco IP phone models will be supported..
6921, 6941, 6945, 6961, 7911, 7921, 7925, 7926, 7931, 7937, 7940, 7941, 7942, 7945, 7960, 7961, 7962, 7965, 7970, 7971, 7975, 8961, 9951, 9971

Enable Services
Go to Cisco Unified Serviceability page and go to Tools > Service Activation
Make sure the following services are enabled..

Cisco Call Manager
Cisco TFTP
Cisco CTI Manager
Cisco AXL Web services
Cisco Call Manager SNMP service 

SNMP Configuration
Now go to Cisco Unified Serviceability > SNMP V1/V2c > Community String
Select your server from the drop down menu and click find..
Click add new to create a new community string or you can use existing string if available.
If you are creating a new string, select ReadNotifyOnly or ReadOnly from access privileges.
Just remember the string you gave..

Create Application User
Now go to Cisco Unified CM Administration page & go to User Management > Application User
Create a new user with an ID & a password. These settings will be used to log into the app later..
This is where you add phones which you want to control.
Click Find More Phones button in the device information area and select and add phones which you need to control..
After adding any phone, save it.. (click on the images to see in full size)


Download & Install the App
Go to https://support.singlewire.com/s/software-downloads/a17C0000008Db3aIAC and download the app. It is completely free for everyone.. (singlewire.com)

If you are using Windows 10 like me, may be it will not install properly just by double clicking the .exe file. Instead it will display the error "Installer UI Mode Error"

If so right click and go to Properties > Compatibility & tick and select Run this program in compatibility mode for Windows 7


After installation completes it will ask you to enter the license key. It is in your downloaded folder. Open it..

Configuring & Using the App

Now go to Edit Preferences 1st.
Provide the required fields..
Here is the place you will enter the Community String..


Now you should be able to control the phones you added at the Application User page by just giving the ip address of the phone.

You can get the IP of the phone from CUCM..


Here is a 7945 phone I tested..
When ever you want to take control of a phone, what you should do is to add the phone to application user and give the IP of the phone to the app..

Monday, January 2, 2017

SBCs (Single Board Computers) are a good way to reduce your infrastructure cost easily. It is more reliable because it is a dedicated hardware and doe not need expensive licenses like when you deal with Hyper-visors. Also it is a good and cheap environment for learners and lab testers of these tools on Linux servers. In this post we will see how Cacti will be installed on a Raspbary Pi.

About Cacti, It is an open source web-based network monitoring tool which can do lot of things if you configured it well.
Go to the Pi's terminal and enter the following command to install Cacti
sudo apt-get install cacti

During the installation, your 1st stop will be to give a root password for the MySQL server.


Because I didn't install a database server this will popup.

(click on images to view in full)


Next, it will ask to install a web server..

I chose the default Apache2..


Now it will go again with a long installation procedure..


Again it will stop to ask whether you like to configure database for Cacti..

Hit Yes and enter the password you entered previously as the database admin password..


Next it will ask for MySQL application password for Cacti..


Now the installation is done..

Now open a web browser from a PC which can reach the Pi and type the "ip address of the Pi with a following /cacti" on url space..

Ex:- 192.168.1.7/cacti


Hit Next and it will ask whether this is a new installation or an upgrade..

Go for new and you will have the following page.


After hitting Finish, you will be asked for the Cacti login. Default login is un:admin pw:admin
So the installation is complete.. Let's configure some devices using SNMP on a later post..

Monday, November 14, 2016

Most of the time Network Engineers use a dedicated laptop with internet connection to access and troubleshoot their networks remotely when they do not have physical access. This is what I call a Remote Access Server here (I don't know what others call it) & I am going to create a low cost solution for this using existing software tools you know. I spent about 50$ for the entire setup.

Before you go through this, go through my previous post Get Raspberry Pi into Networking to complete the basic setup needed.

Install TeamViewer & Fine Tuning

Now download Teamviewer Host for Raspberry Pi from here from the Pi's web browser.
Go to Downloads and right click on the package and install it.

After installation is completed, go to the desktop via TightVNC and go to Menu > Internet > TeamViewer Host and accept terms and conditions and on the app, go to settings > Security and disable the random password from drop down menu.

You can enter following command in Terminal to get the Teamviewer ID and other info from CLI.
teamviewer info 

Now enter the following command to set a static password which will really work.
sudo teamviewer passwd <your password>

This password will be used to log into Teamviewer later on.

Now go to Terminal and enter following command to edit the config.txt file to change the console resolution to match your PC. Resolution of my PC is 1920x1080
sudo nano /boot/config.txt

Now uncomment disable_overscan=1 and framebuffer_widthframebuffer_height parameters and change the values like the following capture.


Hit Ctrl+X and Y and Enter to save and exit.
Hit sudo reboot and after reboot access through your PC's Teamviewer giving the ID and password.

Now you can install other necessary software like Wireshark, SecureCRT or PAC Manager to SSH access etc.

Install Wireshark

Enter following command to download and install Wireshark
sudo apt-get install wireshark

Hit Yes for the dialog box which will prompt

Now enter,
sudo usermod -a -G wireshark pi

Hit sudo reboot and after reboot go to desktop from either TeamViewer or TightVNC and got to
Menu > Internet > Wireshark

Install Putty and Console to a Cisco Device

Start with plugging your console cable to one of the USB ports on your Pi.

Enter following command to Install Putty
sudo apt-get install putty

Time to find out the port of the USB-Serial cable is using. Therefore enter,
dmesg | grep tty


Look at the last line which says ttyUSB0  which means my Pi is using ttyUSB0

While selecting Putty's serial connection select /dev/ttyUSB0


Notes:-

Make sure to change default usernames and passwords after everything is done because it is critical to add some security to this box which could manage the network you work with.

Saturday, October 1, 2016

As many electronic enthusiasts know, Raspberry Pi is a small credit card size computer which runs a Linux operating system called Raspbian which can be used in many ways to do computer engineering stuff. I am writing this post which I will use as a reference to my future posts regarding network solutions which can be provided using this small piece of electronics.

Get Hardware Fixed

Assemble Raspberry Pi into the casing with a fan. Because this is going to be a server, it is better to use a casing with a fan to reduce the heat caused by continuous long time operation. The only thing you need to know in fixing hardware is where to plug the fan. (click on the image to view full size)

Put it just like I have done on the long GPIO / Input Output line running on the board. 

Power (Red) must be connected to the 2nd pin from the left and the Ground (Black) must be connected to the 3rd pin from the left.


Format SD card

SD card is the hard disk of this machine.
You will also need a card reader if your PC does not have a SD card reader slot. Also before buying a SD card, check whether the card supports Raspberry Pi or not though most cards do support. 

To correctly format it use SDF Formatter from here


Go to Option and select Format Type as FULL (Erase) and Format Size Adjustment ON

Now go to My Computer and right click on the SD card and select Format.


This time select the File System as exFAT because it is more faster and select Quick Format and hit Start.


Now the Hard Disk is ready to install the OS.


Burn Raspbian OS to SD card

Now download Raspbian OS (Jessie) from Raspberrypi.org
Do not download Noobs if you do not have a HDMI cable and  a LCD Display because SSH is not active by default in Noobs. I'm going to do SSH to install a remote access software like VNC next.
So I need clean OS which the SSH is enabled by default.

Time to download Win32 Disk Imager from here.


Select the downloaded image and hit Write.

Now the SD card is fully ready to insert in to the Raspberry Pi.


Boot up, SSH & Update Packages

Now plug your Pi to a 2.5A power plug (which is recommended) and plug an Ethernet Cable to the Pi which is connected to your home router. Because DHCP is enabled by default on the Ethernet port, it is the easiest way. And aslo you can guess the ip address which it will get by looking at your PC's IP and if you know how many devices are connected. If you are not sure, download a scanner like Advanced IP Scanner from here.


You can see the IP address of my Pi is 192.168.1.7 which I'm going to SSH into.
Download Putty to do SSH. SecureCRT will not work because of a SSH version mismatch.


Select port 22, SSH etc. Just normal terminal access.

Hit Open.

In the 1st time you SSH, it will prompt an Security Alert in Putty.
Hit Yes to ignore it and log in to the Pi.

Default Logins:-

Log in as: pi
Password: raspberry

After logged in, enter the following command in terminal to access Pi's software configuration tool.

sudo raspi-config

Select Expand Filesystem to use all the space in SD card for root partition.

Hit Ok for the next dialog box and it will ask to reboot. Hit Ok and start a new SSH session after reboot.

Now enter following commands to download & update packages.

sudo apt-get update
sudo apt-get dist-upgrade

To view the available space in memory enter following command anytime in terminal.

df -h

After packages are updated, enter following commands to clean the downloaded update packages to free space & reboot.

sudo apt-get clean
sudo reboot

Install TightVNC to Access Desktop

Enter following commands to install and run TightVNC

sudo apt-get install tightvncserver
tightvncserver

It will ask a password to the remote session. It will be used to login to the Pi via TightVNC. After confirming that it will ask a view only password. You can ignore that.

Remember to enter "tightvncserver" command to start a session with Pi everytime you reboot before accesing through TightVNC.

Now install TightVNC on your native PC from here.

Now open TightVNC from your PC and start a session to your Pi by giving IP address with a : followed by a 1 for the session like shown in the screen capture.


Hit Connect and it will ask the password. Give the password entered a short while ago and hit OK


Now you are on the desktop of the Pi.
Now it's only a GUI. You can move around easily and customize as you like.

From upper right hand corner, you can see the network icon on the tray. Click on it to connect Wifi network too using your Wifi Key. You can also give static IP from here too.


Go to Menu > Preferences > Raspberry Pi Configuration

You can change many important things here like Hostname, Password, Enable Interfaces, Overscan, Date and Time etc and reboot the Pi to make the changes effective.

Sunday, September 18, 2016

I am going to install CCP version 2.7 in a Windows 10 machine which has Internet Explorer v11.
(click on the image for full view)

Log in to Cisco.com and download CCP from here

Run the app as Administrator to install it but do not run it just after install.


Now go to Windows search bar and type Configure Java and open the app.

Go to Security > Edit Site List and Add http://127.0.0.1:8600 and hit OK.


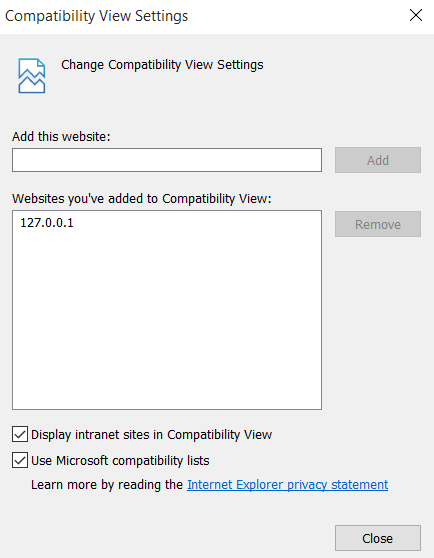
In Internet Explorer, go to Tools > Compatibility View Settings and Add http://127.0.0.1 and hit Close.

Now run CCP desktop shortcut as Administrator and it will be working fine for most PCs if your Java & Flash is up to date.


If not working well, Following steps will also be needed..

Update Java to the latest version from Java.com

Check Adobe Flash Player works for Internet Explorer or update it. You can check it here